
An Introduction to IoT (Internet of Toilets)
· 15 min read · Homelab
TL;DR I built an internet-connected cat litter box with a Raspberry Pi, load cells and Node.js to track my cat's weight and bathroom habits, then gave a talk about it 14 times. This page has the talk, every event, the slides and the full write-up of the hardware, code and data.
My favorite things in life are cats, computers and crappy ideas, so I combined all three and built an internet-connected litter box for my cat with a Raspberry Pi and Node.js. The talk about it is the one I’ve given more than any other: 14 times between March 2019 and December 2020, at conferences, meetups, a coding bootcamp and a hackathon. The code is on GitHub.
What the talk covers
It’s a gentle introduction to the Internet of Things, or how to get started programming hardware with JavaScript and Node, with the litter box as the running example. The full version runs about 20 minutes, and I cut a 15-minute one for CodeLand:
- What IoT is. Anything you put a chip in. My favorite part is the stupid side of it: the weird little projects that straddle the line between totally ridiculous and totally smart.
- Why JavaScript. 58% of IoT developers self-identify as Node.js developers. The garbage collector means you don’t manage memory yourself, you update a device with a
git pullandnpm installinstead of reflashing it, and Node’s event-driven core matches how sensors work. - What the box does. A switch on the lid puts it in maintenance mode while I clean it. Load cells under the box work like an internet-connected bathroom scale: when a cat-sized object steps in, it records his weight and a timestamp.
- The code. Blinking an LED with Johnny-Five as the hello world, then the magnetic lid switch, then the load cells. I couldn’t find a Node package for my load cells, so Node spawns a Python script as a child process that reads the weight every tenth of a second.
- The data. One MongoDB document per day with an array of events. When I added the door sensor, I just changed the schema and didn’t have to touch the old data.
- Wild speculations. Smaller, more powerful hardware doing more compute on the edge, JavaScript tuned for hardware, more hardware support, and batteries, not compute power, staying the bottleneck.
The advice I close with: pick a dumb project, buy a Raspberry Pi for about $35 and make an LED blink. Every time you get stuck, Google it.
How the talk changed
The 2019 versions, starting with IoT and JS(?!) at Byteconf JavaScript, were hands-on Raspberry Pi and Node intros built around smaller demo projects, with no litter box. At Node+JS Interactive 2019 I gave a bigger-picture version, Bringing JavaScript to the IoT Edge, about edge computing and how to model sensor data in MongoDB. I built the litter box live on Twitch in November 2019, and every run from ConFoo Montreal in February 2020 on used it as the demo.
Where I’ve given it
- Byteconf JavaScript 2019, online, March 2019, as IoT and JS(?!): recording, slides
- Grizzhacks, Rochester, Michigan, September 2019: slides
- NYC Code Camp 2019, New York, September 2019: slides
- Node+JS Interactive 2019, Montreal, December 2019, as Bringing JavaScript to the IoT Edge: recording, slides
- ConFoo Montreal, February 2020: recording
- Prime Digital Academy, Minneapolis, March 2020
- (mini) Minnebar, Minneapolis, April 2020
- HalfStack Online, May 2020: recording
- Live Coders Conference, online, June 2020: recording
- CodeLand:Distributed, online, July 2020, the 15-minute version: recording, my upload with chapters
- IoT Innovation Latam, online, September 2020
- DevNation Day 2020, online, September 2020: recording
- Conf42 JavaScript 2020, online, October 2020: recording with chapters
- Nerdearla, online, December 2020: recording
I also talked IoT and JavaScript on JavaScript Jabber episode 432 in May 2020, and the Twitch stream where I built the box is on YouTube.
Slides and resources
- Slides on Speaker Deck, the 20-minute version
- The litter box code on GitHub
- Johnny-Five, the JavaScript robotics and IoT library the code uses
- The Node.js Foundation IoT survey the 58% number comes from
- The litter box on my projects page
The rest of this page is the full write-up: the hardware, the code and how I store the data.
IoT And JS(?!?!)
Okay, so why on earth should you use JavaScript on an IoT project? You might have thought JavaScript was just for web pages. Well, it turns out that JavaScript is famously eating the world and it is now running on lots of new and exciting devices, including most internet-enabled IoT chips! Did you know that 58% of developers identified as IoT developers use Node.js?
The Internet Already Speaks JavaScript
That’s a lot of IoT developers already using Node.js. Many of these developers use Node because the internet already speaks JavaScript. It’s natural to continue building internet-connected devices using the de facto standard of the internet. Why reinvent the wheel?
Easy to Update
Another reason IoT developers use Node is its ease of updating your codebase. With other programming languages commonly used for IoT projects (C or C++), if you want to update the code, you need to physically connect to the device, and reflash the device with the most up-to-date code. However, with an IoT device running Node, all you have to do is remotely run git pull and npm install. Now that’s much easier.
Node is Event-Based
One of the major innovations of Node is the event loop. The event loop enables servers running Node to handle events from the outside world (i.e. requests from clients) very quickly. Node is able to handle these events extremely efficiently and at scale.
Now, consider how an IoT device in the wild is built to run. In this thought experiment, let’s imagine that we are designing an IoT device for a farm that will be collecting moisture sensor data from a cornfield. Our device will be equipped with a moisture sensor that will send a signal once the moisture level in the soil has dropped below a certain level. This means that our IoT device will be responding to a moisture event (sounds a lot like an event loop ;P). Nearly all IoT use cases are built around events like this. The fact that Node’s event-based architecture nearly identically matches the event-based nature of IoT devices is a perfect fit. Having an event-based IoT architecture means that your device can save precious power when it does not need to respond to an event from the outside world.
Mature IoT Community
Lastly, it’s important to note that there is a mature community of IoT developers actively working on IoT libraries for Node.js. My favorites are Johnny-Five and CylonJS. Let’s take a look at the “Hello World” on IoT devices: making an LED bulb blink. Here’s what it looks like when I first got my IoT “Hello World” code working.
Just be careful that your cat doesn’t try to eat your project while you are getting your Hello World app up and running.
My cat eating the IoT Hello World project
IoT (AKA: Internet of Toilets) Kitty Litter Box
This leads me to my personal IoT project, the IoT Kitty Litter Box. For this project, I opted to use Johnny-Five. So, what the heck is this IoT Kitty Litter Box, and why would anyone want to build such a thing? Well, the goal of building an internet-connected litter box was to:
-
Help track my feline friend’s health by passively measuring my cat’s weight every time he sets foot in the litter tray.
-
Monitor my cat’s bathroom patterns over time. It will make it easy to track any changes in bathroom behavior.
-
Explore IoT projects and have some fun!
Also, personally, I like the thought of building something that teeters right on the border of being completely ridiculous and kinda genius. Frankly, I’m shocked that no one has made a consumer product like this! Here it is in all of its completed glory.
Stop Motion gif of the completed IoT Kitty Litter Box
Materials and Tools
-
1 x Raspberry Pi – I used a Raspberry Pi 3 Model B for this demo, but any model will do.
-
1 x Breadboard
-
2 x Female to male wires
-
1 x 3D printer [Optional] – The 3D printer was used for printing the case where the electronics are enclosed.
-
1 x PLA filament [Optional] - Any color will work.
-
1 x Solder iron and solder wire
-
8 x M2x6 mm bolts
-
1 x HX711 module - This module is required as a load cell amplifier and it converts the analog load cell signal to a digital signal so the Raspberry Pi can read the incoming data.
-
4 x 50 kg load cell (x4) - They are used to measure the weight. In this project, four load cells are used and can measure a maximum weight of 200 kg.
-
1 x Magnetic door sensor - Used to detect that the litter box is opened.
-
1 x Micro USB cable
-
1 x Cat litter box - I used a fancy box, but any box with a lid will work just fine.
How Does the IoT Kitty Litter Box Work?
So how does this IoT Kitty Litter Box work? Here are the events that I needed to handle:
-
When the lid of the box is removed, the box enters “maintenance mode.” When in maintenance mode, I can remove waste or refresh the litter.
-
Then the lid of the box is put back on, and the box leaves maintenance mode, waits one minute for the litter to settle, then it recalibrates a new base weight after being cleaned.
-
The box then waits for a cat-sized object to be added to the weight of the box. When this event occurs, we wait 15 seconds for the cat to settle and the box records the weight of the cat and records it in a MongoDB database.
-
When the cat leaves the box, we reset the base weight of the box, and the box waits for another bathroom or maintenance event to occur.
You can also check out this handy animation that walks through the various events that I needed to handle.
Animation of how the box works
How to Write Code That Interacts With the Outside World
For this project, I opted to work with a Raspberry Pi 3 Model B+ since it runs a full Linux distro and it’s easy to get Node running on it. The Raspberry Pi is larger than other internet-enabled chips on the market, but its ease of use makes it ideal for first-timers looking to dip into IoT projects. The other reason I picked the Raspberry Pi is the large array of GPIO pins. These pins allow you to do three things.
-
Power an external sensor or chip.
-
Read input from a sensor (i.e. read data from a light or moisture sensor).
-
Send data from the Raspberry Pi to the outside world (i.e. turning a light on and off).
I wired up the IoT Kitty Litter Box using the schema below. I want to note that I am not an electrical engineer and creating this involved lots of Googling, failing, and at least two blown circuit boards. It’s okay to make mistakes, especially when you are first starting out.
Schematics
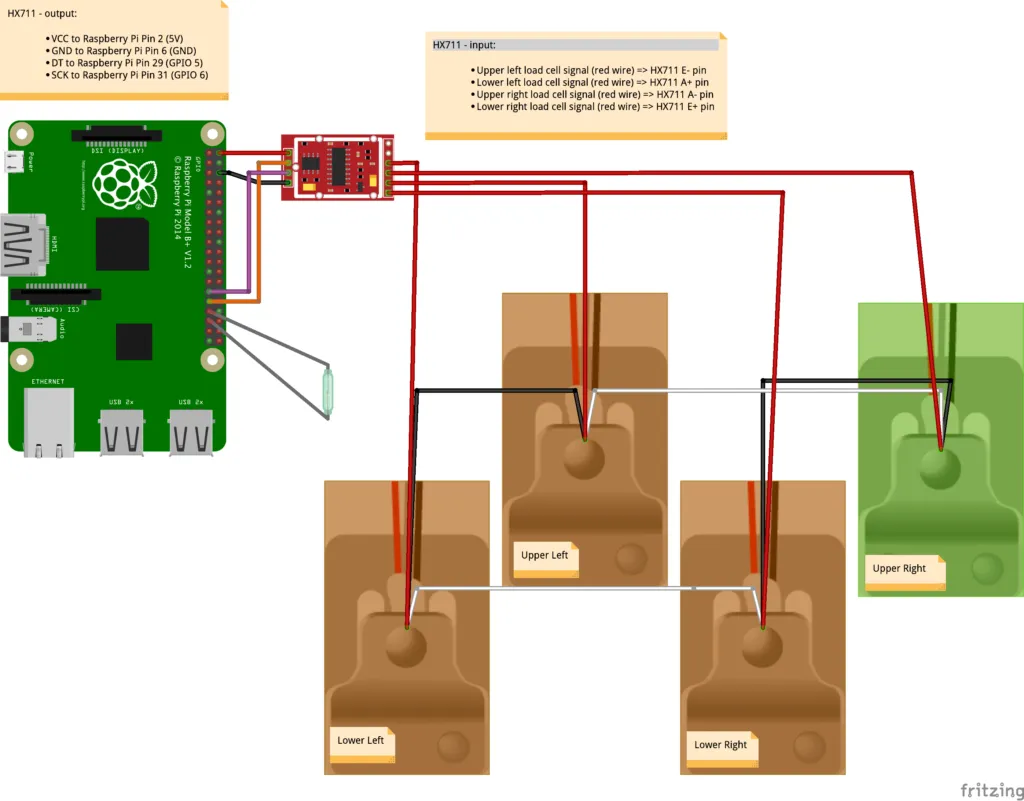 IoT Kitty Litter Box Schema Design
I used these GPIO pins to communicate with the sensors out in the “real world.”
Let’s Dig Into the Code
I want to start with the most simple component on the box, the magnetic switch that is triggered when the lid is removed, so we know when the box goes into “maintenance mode.” If you want to follow along, you can check out the complete source code here.
Magnetic Switch
const { RaspiIO } = require('raspi-io');
const five = require('johnny-five');

// Initialize a new Raspberry Pi Board
const board = new five.Board({
	io: new RaspiIO(),
});

// Wait for the board to initialize then start reading in input from sensors
board.on('ready', () => {
	// Initialize a new switch on the 16th GPIO Input pin
	const spdt = new five.Switch('GPIO16');

	// Wait for the open event to get triggered by the sensor
	spdt.on('open', () => {
		enterMaintenceMode();
	});

	// Recalibrate the box once the sensor has closed
	// Once the box has been cleaned, the box prepares for a new event
	spdt.on('close', () => {
		console.log('close');
		// When the box has been closed again
		// wait 1 min for the box to settle
		// and recalibrate a new base weight
		setTimeout(() => {
			scale.calibrate();
		}, 60000);
	});
});

board.on('fail', (error) => {
	handleError(error);
});
You can see the event and asynchronous nature of IoT plays nicely with Node’s callback structure. Here’s a demo of the magnetic switch component in action.
Demo of the magnetic reed switch detecting litter box lid
Load Cells
Okay, now let’s talk about my favorite component, the load cells. The load cells work like any bathroom scale you may have at home. The load cells are responsible for converting the pressure placed on them into a digital weight measurement I can read on the Raspberry Pi. I start by taking the base weight of the litter box. Then, I wait for the weight of something that is approximately cat-sized to be added to the base weight of the box and take the cat’s weight. Once the cat leaves the box, I then recalibrate the base weight of the box. I also recalibrate the base weight after every time the lid is taken off in order to account for events like the box being cleaned or having more litter added to the box.
In regards to the code for reading data from the load cells, things were kind of tricky. This is because the load cells are not directly compatible with Johnny-Five. I was, however, able to find a Python library that can interact with the HX711 load cells.
#! /usr/bin/python2

import time
import sys
import RPi.GPIO as GPIO
from hx711 import HX711
# Infintely run a loop that checks the weight every 1/10 of a second
while True:
   try:
      # Prints the weight - and send it to the parent Node process
      val = hx.get_weight()
      print(val)

      # Read the weight every 1/10 of a second
      time.sleep(0.1)

   except (KeyboardInterrupt, SystemExit):
      cleanAndExit()
In order to use this code, I had to make use of Node’s Spawn Child Process API. The child process API is responsible for spinning up the Python process on a separate thread. Here’s what that looks like.
const spawn = require('child_process').spawn;

class Scale {
   constructor(client) {
      // Spin up the child process when the Scale is initialized
      this.process = spawn('python', ['./hx711py/scale.py'], {
            detached: true,
      });
   }

   getWeight() {
      // Takes stdout data from Python child script which executed
      // with arguments and send this data to res object
      this.process.stdout.on('data', data => {
            // The data is returned from the Python process as a string
            // We need to parse it to a float
            this.currWeight = parseFloat(data);

            // If a cat is present - do something
            if (this.isCatPresent()) {
               this.handleCatInBoxEvent();
            }
      });

      this.process.stderr.on('data', err => {
            handleError(String(err));
      });

      this.process.on('close', (code, signal) => {
            console.log(
               `child process exited with code ${code} and signal ${signal}`
            );
      });
   }
   [...]
}

module.exports = Scale;
This was the first time I have played around with the Spawn Child Process API from Node. Personally, I was impressed by how easy it was to use and troubleshoot. Another Pi 3B now runs a 32x32 pixel art frame on my desk that Home Assistant pushes alerts to. It’s not the most elegant solution, but it totally works for my project and it uses some cool features of Node. Let’s take a look at what the load cells look like in action. In the video below, you can see how pressure placed on the load cells is registered as a weight measurement from the Raspberry Pi.
Demo of the load cell measuring weight changes
How to Handle Internet of Toilets Data
Okay, so as a software engineer at MongoDB, I would be remiss if I didn’t talk about what to do with all of the data from this IoT device. For my IoT Litter Box, I am saving all of the data in a fully managed database service on MongoDB Atlas. Here’s how I connected the litter box to the MongoDB Atlas database.
const MongoClient = require('mongodb').MongoClient;
const uri = 'YOUR MONGODB URI HERE';
const client = new MongoClient(uri, { useNewUrlParser: true });
client.connect((err) => {
	const collection = client.db('IoT').collection('toilets');
	// perform actions on the collection object
	client.close();
});
Internet of Toilets Data Best Practices
There are a lot of places to store your IoT data these days, so I want to talk about what you should look for when you are evaluating data platforms.
High Database Throughput
The first thing when selecting a database for your IoT project, you need to ensure that your database is able to handle a massive amount of concurrent writes. Most IoT architectures are write-heavy, meaning that you are writing more data to your database than reading from it. Let’s say that I decided to start mass manufacturing and selling my IoT Kitty Litter Boxes. Once I deploy a couple of thousand boxes in the wild, my database could potentially have a massive amount of concurrent writes if all of the cats go to the bathroom at the same time! That’s going to be a lot of incoming data my database will need to handle!
Flexible Data Schema
You should also consider a database that is able to handle a flexible schema. This is because it is common to either add or upgrade sensors on an IoT device. For example, on my litter box, I was able to easily update my schema to add the switch data when I decided to start tracking how often the box gets cleaned.
Your Database Should Easily Handle Time Series Data
Lastly, you will want to select a database that natively handles time-series data. Consider how your data will be used. For most IoT projects, the data will be collected, analyzed, and visualized on a graph or chart over time. For my IoT Litter Box, my database schema looks like the following.
{
	"_id": { "$oid": "dskfjlk2j92121293901233" },
	"timestamp_day": { "$date": { "$numberLong": "1573854434214" } },
	"type": "cat_in_box",
	"cat": { "name": "BMO", "weight": "200" },
	"owner": "Joe Karlsson",
	"events": [
		{
			"timestamp_event": { "$date": { "$numberLong": "1573854435016" } },
			"weight": { "$numberDouble": "15.593333333" }
		},
		{
			"timestamp_event": { "$date": { "$numberLong": "1573854435824" } },
			"weight": { "$numberDouble": "15.132222222" }
		},
		{
			"timestamp_event": { "$date": { "$numberLong": "1573854436632" } },
			"type": "maintenance"
		}
	]
}
Summary
Alright, let’s wrap this party up. In this post, I covered why you should consider using Node for your next IoT (Internet of Toilets) project: It’s easy to update over a network, the internet already speaks JavaScript, there are tons of existing libraries/plugins/APIs (including CylonJS and Johnny-Five), and JavaScript is great at handling event-driven apps. I walked through a real-life Node-based IoT project, my IoT Kitty Litter Box, and dug into the code base. I also discussed what to look for when selecting a database for IoT projects: It should be able to concurrently write data quickly, have a flexible schema, and be able to handle time-series data.
Final IoT Kitty Litter Box Assembly process
What’s next? Well, if I have inspired you to get started on your own IoT project, I say, “Go for it!” Pick out a project, even if it’s “crappy,” and build it. Google as you go, and make mistakes. I think it’s the best way to learn. I hereby give you permission to make stupid stuff just for you, something to help you learn and grow as a human being and a software engineer. If you want to see what else I’ve been building, check out my other projects.
When you’re ready to build your own IoT device, check out MongoDB Atlas, MongoDB’s fully managed database-as-a-service. Atlas is the easiest way to get started with MongoDB and has a generous, forever-free tier.
If you liked this post, consider sharing it on Hacker News, Bluesky, LinkedIn, or X.

Joe
Karlsson
I write about my homelab, AI tools, databases, and the weird stuff I build on the side.
More about me →